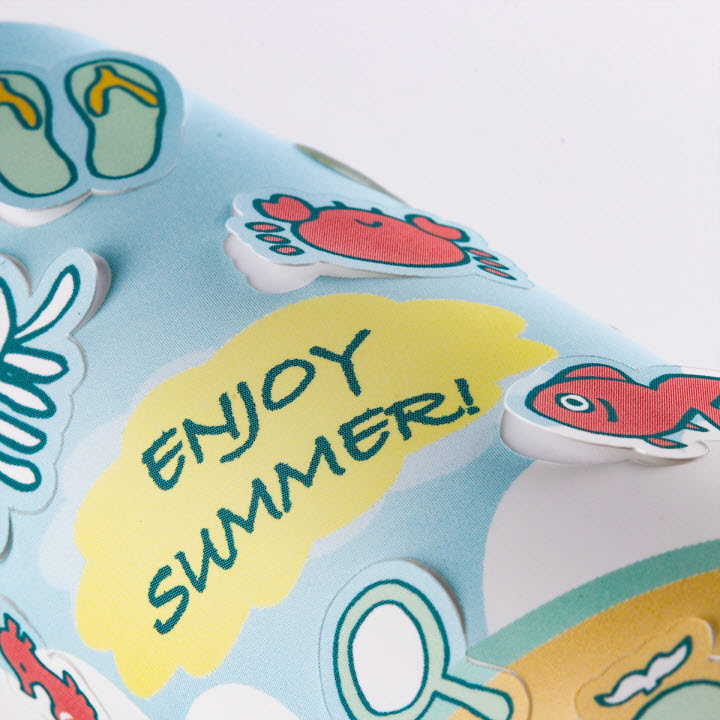
Raster Image
Raster image are bitmaps which is grid of individual dots (pixels) that collectively compose image with color information.
Example of raster images include photo taken with digital camera, image created with Photoshop, etc.
Raster graphics render images as collection of countless pixels, hence, image quality is determined by the resolution.
There are many file formats which are categorized under raster image, among those are JPG, PNG, PSD, PDF and etc., however, it is difficult to determine whether there is raster image created with file format such as CDR, PDF, EPS and AI.
Vector Image
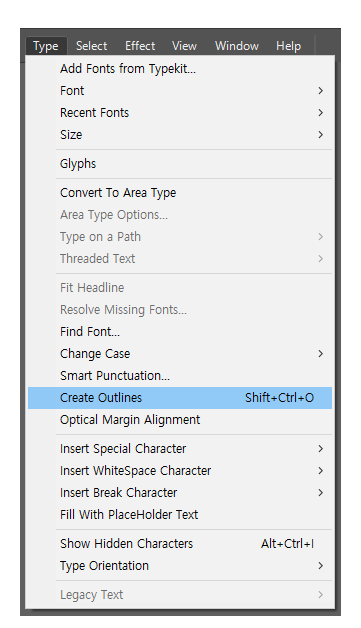
Unlike pixel-based raster image, vector image which is usually created using Illustrator and Corel Draw are composed based on mathematical formulas that define symmetrical primitives such as lines, circles, etc. Therefore, compared to raster image, vector image is more malleable, flexible, versatile and easy to use.
It’s highly stretchable with no maximum or minimum limit for sizing, while maintaining the image quality.
The outline processing function allow user to modify the font of the image.
Despite having numerous advantages over raster image, one limitation is that problem may rise when converting vector image into printing data and the image has to be rasterized with resolution that compatible to printing process.
There are various formats such as PDF, Al, CDR, EPS, etc. for vector images, all these files can be saved as raster images, however one should always check all components before saving for printing used to avoid broken files.
RGB and CMYK
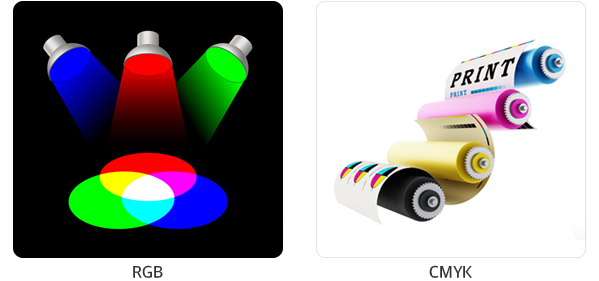
RGB is an acronym for Red (R), Green (G), Blue (B), and these three colors are called "Three Primary Colors of Light".
Since these are light, the higher the density, the brighter it is.
A monitor or a television is perfect example of media that display images with light.
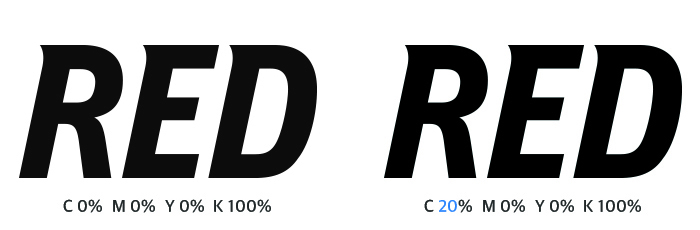
The color densities for printing is represented by four different inks CMYK, which are Cyan, Magenta, Yellow and Black (K=Black).
In contrast to RGB where color becomes brighter when all three colors are mixed, the mixture of CMYK generates darker color.
Therefore, a mixture of 100% concentration CMYK will generate a vivid black color.
Monitor and Printing Color
The monitor display color with light while printing display color with ink and human eyes recognizes color based on the medium that display it, hence, color seen on monitor is different from color seen on printing.
With rapid technology development, when CMYK color mode is selected on design software (Photoshop, Illustrator, Corel, etc.), user is able to predict the color output of their designs.
Despite not 100% accurate, it can serve as a preview for the final output.
Colors will always differ when printed on paper especially high saturated color such as pink and fluorescent which are printed separately form CMYK, the color contrast tend to be more visible.
Color differ slightly when seen on different monitors in the same company.
Similarly, for printing machines, it is not possible to generate the exact same output even printing is done with same machine model within a company.
Colors varies depending on different textures, ink absorption, drying speed and other features of the paper.
Even with same paper, the humidity and temperature of the day can affect colors presentation.
Monitors presents colors with lights, while printing presents colors using a collection of 100% density points (dots), hence, the lower the density, the weaker the color is.
Spot Color and Process Color
Both colors selection is available in Photoshop and Illustrator under Swatch function. Process color is CMYK swatch which make it easy for user to compose their design as once the CMYK values are entered during login, the printing colors will always remain as CMYK. Since spot color does not print based on the four colors in CMYK, hence, separate color plates are needed to print these designated colors. And spot color will autmatically be converted and incorporated into the four colors combination when prinitng using machines that only utilizes CMYK color system.
When this happen, the colors value available in PANTONE and in CMYK color conversion table displaying each spot color will changed into CMYK values for print. If colors are created randomly without a color conversion table, the created value seen on the screen will be set to represent spot color and printing process will take place. For example, if user created spot color randomly without using color conversion table, if the color value on the screen is (M100, Y100), hence, for machine that recognizes only CMYK color system, only red color will be printed.
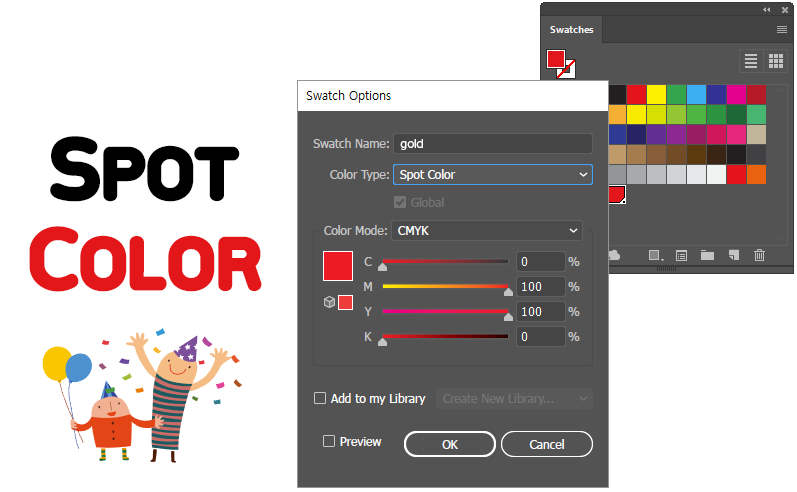
Therefore, when printing is needed, all spot colors used for the designs should be converted into CMYK colors to prevent printing error.
Color Shift
Printing process is heavily affected by different conditions. For offset printing, there might be more than 10% color differences occur if color setting is not done right. Whilst, for digital printing, color difference can go as high as 5% for each condition. Although it is still a difficult task to solve this problem, our company strive the hardest to cater the color deficiency matters such as utilizing six color printing method and shorten turnaround cycle for disposable items. However, due to the limitation of technology in printing industry today, a complete resolution for this problem has yet been developed.
Resolution
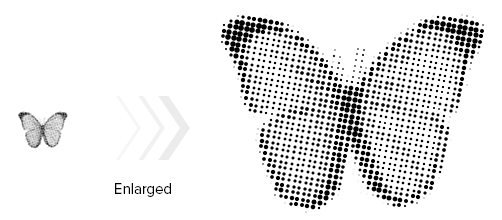
Resolution is a measure used to describe the sharpness and clarity of an image by using DPI (Dot Per Inch), which measure the number of pixels within one-inch range. Image resolution suitable for printing should be more than 300 DPI to maintain a printable image quality. Moreover, the resolution of the printing machine which decides the resolution for output images is originally fixed to the machine, therefore, it is not possible to print out all pixels in the data with high resolution image. (It won’t be visible even after printing^^).
Below are some of the problems that may occur when prinitng with low resolution.

Aliasing: An image composed by dots will be clearly visible (such as picture, (JPG), small rectangular groups that formed the picture will be visible when enlarged.
Small jagged staricase like pattern are formed due to low resolution and it is called aliasing.
Since common monitors has no problem displaying images even with only 72 DPI resolution, small jagged staircase can be seen on the screen and will shows on the final output unless the resolution is set to be printable which is 300 DPI or higher.
Blur and dull output: To prevent aliasing problem, an image with 72 DPI will be changed to 300 DPI for printing purpose, and this adjustment solved the problem of visible aliasing on final output, however, the picture might appear blur and not sharp.
For example, when zoom into a picture of earth with high resolution, the people in that picture will be visible, same principle can be applied in zooming into picture with low resolution, the square is enlarged, hence, it will not appear on the output and only a blur and unclear big square will be seen.


 Cart
Cart